Putting it all together.
 The
time has come, and the assembled drive train is going to be
installed into the former engine compartment. The hoist is an
absolutely necessary for
this, don't even think about installing whole thing by hand even if
several people with ropes are volunteering to help
out.
The
time has come, and the assembled drive train is going to be
installed into the former engine compartment. The hoist is an
absolutely necessary for
this, don't even think about installing whole thing by hand even if
several people with ropes are volunteering to help
out.
Basically, the
sequence of these final steps is kind of obvious - the components
on the bottom are installed first, and then everything else is
stacked up on top. In my case "everything else" meant the power
inverter, the batteries, small 12V auxiliary battery, the front
radiator, the water pump, the water valves, junction box, main
fuses, vacuum gauge and other small stuff. Wiring goes next,
battery cables first, motor cables second and low voltage wiring
last. The plumbing is done when everything else is in place. The
photos below will show one of the most exciting parts of the
project.
 The
drive train is hanged from the hoist. The total weight of it is
about 150 kg (330 lb.).
The
drive train is hanged from the hoist. The total weight of it is
about 150 kg (330 lb.).
 Orient whole thing correctly
and ready to lower.
Orient whole thing correctly
and ready to lower.
 Another photo of the train
outside the car.
Another photo of the train
outside the car.
 The drive train is lowered and
the bolt is inserted in the left rubberized engine support. The
clutch cable attached.
The drive train is lowered and
the bolt is inserted in the left rubberized engine support. The
clutch cable attached.
 At this point it is
convenient to mount the heater and the charger.
At this point it is
convenient to mount the heater and the charger.
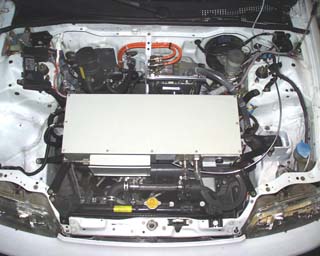
 Once the position of the
power inverter is determined, it is lowered on top of the drive
train.
Once the position of the
power inverter is determined, it is lowered on top of the drive
train.
 Some
unexpected obstacles developed when I was inserting drive half
shafts in the gear box sockets. Namely, the left CV joint boot was
touching the adapter plate edge preventing from complete insertion.
Well, time again for the angle grinder. When the plate edge was cut
off and the joint inserted, it was touching the motor case.
Oops...
Some
unexpected obstacles developed when I was inserting drive half
shafts in the gear box sockets. Namely, the left CV joint boot was
touching the adapter plate edge preventing from complete insertion.
Well, time again for the angle grinder. When the plate edge was cut
off and the joint inserted, it was touching the motor case.
Oops...
Thanks God, it was only touching. A slight notch in the motor body
allowed CV to rotate freely with about 1 mm clearance from the
motor. Whew.
Here and there, unavoidable small
problems like this were discovered and taken care of. For instance.
the front battery post was almost touching the motor terminals
cover. I didn't want to leave the cover off and let the moisture to
get into the motor winding. So, I cut the post off and used the
side terminal...
Of course other than under hood
work, a lot of other places were waiting have to be designed on the
fly and done. The chargers installation, the spring coils upgrade,
and quite a few small things you will discover you forgot to take
care of. But, step by step, your creation will approach the
finished and driveable state, and the closer you are the more
temptation you will have to cut some corners and hit the road as
quickly as you can. Be careful and don't compromise safety
here.
I will post more images in this
section later. For now,
Installing drive half shafts. This one presented the problem.
Another view of the
transmission from underneath.
First, it's rubbing against the
motor, and second - won't go in all the way...
The adapter plate
had to be grinded on the spot. The motor wall too...
Other photo. The gap between
half shaft and the motor is 1mm.
What the finished under
hood look like (large 1280x1024 image).
