The Ah counter.
Manufacturer: BRUSA Elektronik AG
Cost $700
Available from Metric Mind Engineering
 How comfortable would you be driving down the road without knowing
how much fuel you have left? In an electric vehicles Ah (Ampere-hour) counter is your
"fuel gauge". There are few models available with different features set and
style. While in the USA by far the most common instrument to track energy consumption is
"e-meter" - sophisticated device now called Link-10 made by Cruising Equipment
company, I chose BCM420 Ah counter made by Brusa Electronik. Several reasons for this
choice:
How comfortable would you be driving down the road without knowing
how much fuel you have left? In an electric vehicles Ah (Ampere-hour) counter is your
"fuel gauge". There are few models available with different features set and
style. While in the USA by far the most common instrument to track energy consumption is
"e-meter" - sophisticated device now called Link-10 made by Cruising Equipment
company, I chose BCM420 Ah counter made by Brusa Electronik. Several reasons for this
choice:
- Feature set. Brusa counter allows to measure
Ah as well as Wh in and out of traction battery. Also, it shows full pack voltage, half
pack tap voltage (helps to spot single battery problem if half pack displayed voltage
value is not equal half of the full pack displayed voltage), battery current (in and out).
Also, up to 3 temp sensors can be connected to it to display the temperature in 'C or 'F;
this will be used to display outside temp, battery temp and drive system cooling liquid
temp.
The BCM420 can be programmed to drive external analog gauges - for example it is
convenielt to have a linear SOC gauge, battery current or voltage gauge, amp-hours or
whatt-hours gauge, etc.
-Functionality. This Ah counter is designed to work together with Brusa charger I'm
planning to use. This is important if I want to recharge my traction pack based on Ah
spent during driving. if I program the charger to replenish exact Ah amount spent since
last full charge (+ some extra, compensating for less than 100% charging efficiency), this
Ah and charger combo allows to do it easily. This extra overcharge put back is displayed
as negative value and memorized until I start drive, at which point the counter
automatically resets to zero (this can be disabled if so desired).
- Style. I wanted to integrate the display into the main instrument cluster so it looks as
factory installed unit. All gauges in Honda are white pointers on the black background and
using something like round red LED display would be totally off the style. Brusa unit has
high contrast backlit LCD screen which would blend into the cluster very nicely.
- Size. Compared to Link-10 Brusa counter consists of two separate units - small display
module which just counts pulses provided by active shunt. This shunt has conversion
circuitry PCB sitting right on top of it, taking care of converting battery current and
voltage (after some math is performed) into positive or negative pulses which then are
sent to the display module.
Unlike Link-10, BCM420 counter does not have RS232C output.
However, Siemens system software does, and can track running current, voltage, power,
watt-hours, torque, and many more parameters than I really want to know about.
Well, let see how BCM counter is installed and integrated
into the dash instrument cluster. Whole process is as follows:
 The instrument cluster before
modifications. Two central gauges are going to be replaced.
The instrument cluster before
modifications. Two central gauges are going to be replaced.
 Cluster has to be removed. The screws under these tabs
(and two more screws in front) hold the visor in place.
Cluster has to be removed. The screws under these tabs
(and two more screws in front) hold the visor in place.
 The cluster is out - rear side.
 Front side. The acrylic glass screen is off.
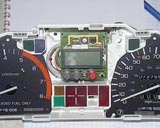
 Both gauges are off - they held by 6 screws from the back. To
gain access to them flexible PCB had to be removed.
Both gauges are off - they held by 6 screws from the back. To
gain access to them flexible PCB had to be removed.
 Size comparison - the BCM counter display module is actually
smaller than the gauges assembly being removed.
Size comparison - the BCM counter display module is actually
smaller than the gauges assembly being removed.
 Size comparison - side view. The display module is thicker
than gauges, but not by much. As you'll see it will fit nicely.
Size comparison - side view. The display module is thicker
than gauges, but not by much. As you'll see it will fit nicely.
 Back side connector.
 Back side of the display module with all the wires connected
and ready to be installed.
Back side of the display module with all the wires connected
and ready to be installed.
 The wires are fed through a hole drilled in the plastic back.
 Display module is in place and attached by one single M5 screw. So far so
good.
Display module is in place and attached by one single M5 screw. So far so
good.
 Since LCD display is smaller than the
cutout for the gauges size, a small bezel had to be made. Believe it or not, this proved
to be the most difficult part of installation and it took 2 attempts to get it right.
things would be much easier if the glass could be removed to gain access to the module
from the front, but I didn't want to remove it and thus created unnecessary problems. If I
knew how awkward it would be to make tight fit, I'd removed the glass. Well, now I know...
Since LCD display is smaller than the
cutout for the gauges size, a small bezel had to be made. Believe it or not, this proved
to be the most difficult part of installation and it took 2 attempts to get it right.
things would be much easier if the glass could be removed to gain access to the module
from the front, but I didn't want to remove it and thus created unnecessary problems. If I
knew how awkward it would be to make tight fit, I'd removed the glass. Well, now I know...
The bezel was cut out of the jacket of old 5Ľ floppy disk.
The texture of the jacket material closely resembles the finish of the cluster face. Once
correct size had been cut, it's installed onto the display and glued from inside to the
black plastic front wit PVC glue. It turn out to be accurate enough, but if I were to
re-do it, I'd do it from the front. Anyway, result was as expected and display module
looks like it was always there. Also, the control buttons were re-located to the dash
since I was not going to drill holes in the front glass...
Remember these? Good crafting material for the bezel...
The front face is put back to see the shape of bezel I
need to make.
A bezel taped from inside to the face of the cluster
(trial fit). Later it will be glued to it.
Active shunt module (without housing). This 100 A rated shunt
allows to measure currents up to 250 A max.
Close up photo. Center RG45 connector is for the display
module; gray one for battery voltage, orange one - for two temp sensors.
The metal enclosure for the shunt PCB.
Tapping the holes for the glands.
The shunt board is installed in the enclosure,
wires connected to its vibration proof connectors and PCB is
wrapped in insulating plastic. Just in case.
The enclosure is put in the place of former ECU, under
passenger's feet.
 The same protective cover goes back. OEM look is restored.
 Since LCD display is smaller than the cutout for the gauges size, a small
bezel had to be made. Believe it or not, this proved to be the most difficult part of
installation and it took 2 attempts to get it right. things would be much easier if the
glass could be removed to gain access to the module from the front, but I didn't want to
remove it and thus created unnecessary problems. If I knew how awkward it would be to make
tight fit, I'd removed the glass. Well, now I know...
Since LCD display is smaller than the cutout for the gauges size, a small
bezel had to be made. Believe it or not, this proved to be the most difficult part of
installation and it took 2 attempts to get it right. things would be much easier if the
glass could be removed to gain access to the module from the front, but I didn't want to
remove it and thus created unnecessary problems. If I knew how awkward it would be to make
tight fit, I'd removed the glass. Well, now I know...
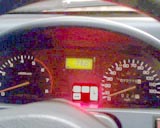
First attempt to turn it on. Works as expected. Now - back
lit.
Back lit is on when 12V power is on, not only when parking
lights are on. Works like a charm. I love EV gadgets :-)
